Why use Calipers?
Calipers are one of the quickest and most accurate methods for taking dimensional measurements. Most modern calipers can provide accuracy up to +/- 0.001 inches. The design of other handheld dimensional measuring devices, like rulers and tape measures, allow for a higher degree of uncertainty and human. Although their design has changed greatly, calipers have long been one of the preferred methods of dimensional measurements. In fact, the use of calipers as far back as the 6th century BC.
Caliper Components
Before we explain how to use calipers, let’s first look at the major components of a caliper.
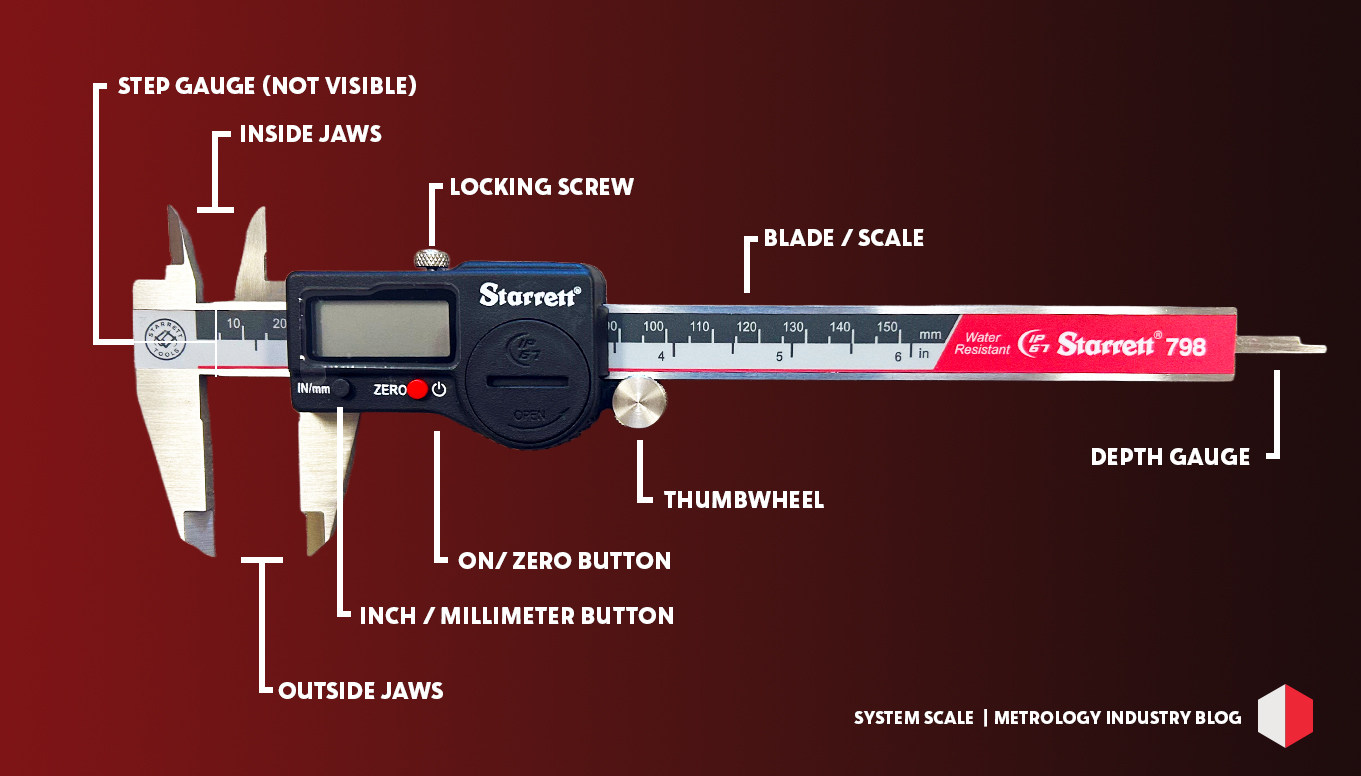
- Step Gauge: Measures the distance from an object’s edge to another point.
- Inside Jaw: Measures an object’s internal dimensions.
- Locking Screw: Tightens to hold the outside jaws in place.
- Blade/Scale: On most modern calipers, the blade displays both metric (top) and imperial (bottom) measurements.
- Outside Jaw: Measures the external dimensions of an object.
- Inch/Millimeter Button: Switches between metric and imperial units.
- On/Zero Button: Resets the calipers to zero.
- Thumbwheel: Adjusts the position of the jaws.
- Depth Gauge: Measures hole depth and thickness.
Caliper Setup & Inspection
Before using calipers, you must first perform an inspection and reset to zero. Start your inspection with the calibration certificate. The certificate should show the maximum accuracy and display the next calibration date. Calibration is the only way to ensure accurate values.
If the calibration is up to date, it’s time to start the physical inspection. First, use the thumbwheel to gently open the jaws around 1/2 inch. This movement should be a smooth gliding motion with minimal resistance. Any resistance may mean you need to loosen the locking screw or lubricate the blade. When everything is moving smoothly, inspect the measuring edges for debris and damage. If you are satisfied with their condition, close the jaws completely. Never force the jaws closed. A gap between the outer jaws could mean your equipment will require professional repair and calibration.
Once satisfied with your equipment’s condition, double-check that the jaws are closed completely, then zero the calipers. To set zero on dial calipers, rotate the bezel on the bottom of the dial until the dial points to zero. For digital calipers, press the On/Zero button. Now you are ready to measure!
The 5 Primary Caliper Measurements
There are five primary types of measurements you can perform with a caliper: Inside, Outside, Depth, Step, and Compound. Below, we will explain exactly what these measurements are and how to perform them.- Outside Measurements Outside measurements are the most basic type of caliper measurement. These measurements can be used for measuring diameter, thickness, or the outside distance between two points. To make this measurement, simply open the outside jaws, place them around your object, and gently close the jaws until they make firm contact with your object. For an accurate measurement, ensure the surface is parallel to the jaws. Never force the jaws closed around your object; as soon as there is resistance, stop your adjustment. If you over-tighten the jaws, you run the risk of damaging your caliper and getting an incorrect measurement.
- Inside Measurements As the name implies, inside measurements can be used to measure the internal dimensions of an object. These are ideal for finding the diameter of a hole or the width of a channel/groove. To take this measurement, close the caliper jaws and insert them into your object. Just like with the outside measurement, gently open the jaws until you encounter resistance. Since inside measurements can be a little more difficult to line up correctly, double-check that the caliper is making full contact with the intended surface and is not turned at an awkward angle.
- Depth Measurements To make a depth measurement, set your object on a level surface and place the back end of your caliper on top. Make sure you leave enough clearance so the depth gauge is perpendicular to the surface being measured and can descend completely to the level surface or the bottom of the hole. For the best results, we suggest using a surface plate as your level surface.
- Step Measurements The ability to take a step measurement is an often overlooked feature available on many calipers. To make this measurement, open the caliper slightly and place the top caliper’s back edge (the sliding jaw) on the edge of your upper step. Next, lower the front edge (the fixed jaw) until it makes contact with your lower step. For an illustration, please see the diagram below.
- Compound Measurements The final type of measurement is the compound measurement. This measurement either involves a combination of two or more of the measurements above and the zero button (for digital calipers) or a little bit of math (for dial calipers). Compound measurements are commonly used to find center distance, remaining thickness, and comparative measurements. To take a compound measurement, measure your first dimension, and before removing the caliper from the object, hit the zero button. With your new zero, take your second measurement. The number that appears on the readout is the difference between your two measurements. If you are using a dial or vernier caliper, you will have to write down and subtract the measurements to find your difference.
System Scale is Here to Help
Whether you need help selecting the right caliper for your process or ensuring the accuracy of your equipment, System Scale is here to help. Our metrology lab offers ISO/IEC 17025 accredited calibration services, so you can be confident that your calipers are performing at their best. Please fill out the form below, and one of our experts will be in touch to assist.